How to Upload Unity Webgl to Itchi

Cover image for Create a Unity to itch.io Deployment Pipeline Using Butler & Bash Scripting

Don Juan Javier

Create a Unity to itch.io Deployment Pipeline Using Butler & Bash Scripting

I recently uploaded my outset game to itch.io, and discovered that there is a nifty tool called Butler that allows uploading a build from the command line.

Withal, I wanted to streamline the build -> cipher -> upload steps, so hither'southward what I did:

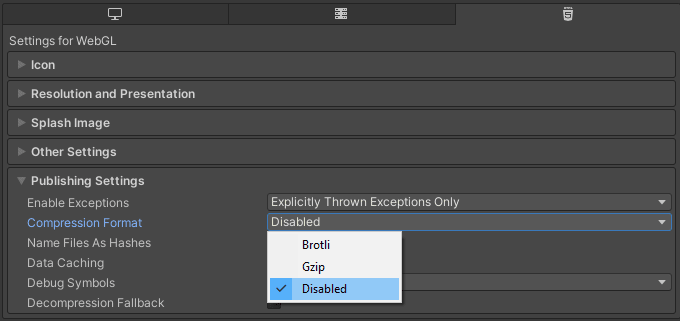
1: Create WebGL build in Unity

Beginning, I followed the official Unity docs for publishing WebGL games.

In the Unity Build Settings, I selected a WebGL build and made sure to turn compression off in Player Settings (Project Settings -> Player), afterward running into an outcome with the build not working in the browser.

Disable compression in Unity Player Settings

Finally, I made sure all of my scenes were checked that I wanted to include, and selected Build (I also always use the Clean Build choice). I used the default build path of ./Build.

Unity Build Settings

two: (Optional) add docker-compose to exam WebGL build

Afterwards the build completed, I wanted to test things out before uploading to itch.io. I followed this guide to fix my own docker-compose file to run things locally.

BTW, getting Docker to piece of work on a Windows motorcar took some effort... I had to enable CPU virtualization in my BIOS settings. I'thou a BIOS noob, so that was a fiddling scary, but I finally got things working, and docker-etch up worked like a charm.

3: Adding deploy.sh script

I wanted my script to automate two things:

  1. Packaging my build into a .zip file
  2. Uploading to itch.io via Butler

My Windows machine uses 7-Zip for archive cosmos/extraction, so I had to add 7-Zip to my Windows path. (Alternatively, I could have used the zip command, but information technology wasn't working for me - I didn't feel like going through the hassle of installing GoW just to utilise zip).

Next, I needed to install Butler and add it to my Windows path. I only added a directory called C:\Bin and placed the downloaded Butler binder there, and set the Windows path to C:\Bin\Butler.

Afterward all was said and done, I could run the following commands:

                          # nothing file to archive              ZIPFILE              =              "/path/to/zipfile-to-create"              7z a              $ZIPFILE              "/path/to/Build"              >              NUL                      

Enter fullscreen manner Exit fullscreen fashion

(Note, the > NUL higher up simply silences the output from the zip control; besides NUL would be /dev/null on Mac/Linux).

                          # upload to itch.io              USERNAME              =              "my-crawling-io-username"              GAME              =              "my-awesome-game"              Channel              =              "html"              VERSION              =1.0.0 butler push              $ZIPFILE              "              ${              USERNAME              }              /              ${              GAME              }              :              ${              Channel              }              "              --userversion              $VERSION                      

Enter fullscreen mode Exit fullscreen mode

Viola! Everything worked like a charm, and my newly-uploaded .zip file now showed up in my edit game folio.

Conclusion

Now that this script is in place, deploying new releases for my game is ridiculously easy. Hopefully this guide tin can help yous streamline your game release cycle equally well.

Deploy script in action

Here'southward my full deploy.sh script:

Config/deploy.sh

                          #!/bin/fustigate              USERNAME              =              "my-itch-io-username"              GAME              =              "my-awesome-game"              Channel              =              "html"              #              # COLORS              # see: https://stackoverflow.com/questions/5947742/how-to-alter-the-output-color-of-echo-in-linux              #              NC              =              '\033[0m'              # No Color              Black              =              '\033[0;30m'              # Blackness              RED              =              '\033[0;31m'              # Red              Green              =              '\033[0;32m'              # Light-green              Yellow              =              '\033[0;33m'              # Yellow              BLUE              =              '\033[0;34m'              # Bluish              Royal              =              '\033[0;35m'              # Imperial              CYAN              =              '\033[0;36m'              # Cyan              WHITE              =              '\033[0;37m'              # White              GREY              =              '\033[ane;30m'              # Grey              #              # UTILS              #              log()              {              echo              -e              "              ${              GREY              }${              1              }${              NC              }              "              }              info()              {              echo              -due east              "              ${              CYAN              }${              i              }${              NC              }              "              }              success()              {              echo              -e              "              ${              Light-green              }                            ${              1              }${              NC              }              "              }              warn()              {              echo              -e              "              ${              Yellow              }${              1              }${              NC              }              "              }              error()              {              echo              -eastward              "              ${              Cerise              }${              1              }${              NC              }              "              }              prompt()              {              read              -p              "              $one                              "              -due north              one              -r              repeat              # (optional) move to a new line              if              [[              !              $Respond              =~ ^[Yy]$                            ]]              and so              warn              "user cancelled."              exit              1              fi              }              assertFileExists()              {              if              [              !              -f              "              $ane              "              ]              ;              and then              fault              "              $1                              does not exist."              exit              ane              fi              }              assertDirExists()              {              if              [              !              -d              "              $1              "              ]              ;              then              error              "              $1                              does non exist."              go out              1              fi              }              #              # Go VERSION              #              VERSION              =              $(              cat              version.json              \              |              grep              version              \              |              head              -1              \              |              awk              -F:              '{ print $2 }'              \              |              sed              's/[",]//m'              \              |              tr              -d              '[[:space:]]'              )              SAFE_VERSION              =              "              ${              VERSION              //./              $'-'              }              "              #              # SCRIPT              #              info              "WELCOME TO THE UNITY DEPLOYMENT SCRIPT!"              info              "About to push version                            ${              Blood-red              }${              VERSION              }${              CYAN              }                              - proceed?"              prompt              "(y/n)"              assertFileExists              "../Build/index.html"              mkdir              -p              "../Athenaeum"              ZIPFILE              =              "../Archives/build-              ${              SAFE_VERSION              }              .nada"              log              "creating aught archive for                            ${              ZIPFILE              }              ..."              # zip              7z a              $ZIPFILE              "../Build"              >              NUL  log              "deploying to itch.io..."              # push to itch.io              butler push              $ZIPFILE              "              ${              USERNAME              }              /              ${              GAME              }              :              ${              Channel              }              "              --userversion              $VERSION              success              "All done!"                      

Enter fullscreen way Exit fullscreen manner

I also added a simple version file containing version info for my game to make it piece of cake to update without needing to change my script:

Config/version.json

                          {                                          "version"              :                                          "1.0.0"                                          }                                                  

Enter fullscreen manner Exit fullscreen mode

Cover Photograph by Hello Lightbulb on Unsplash

tozernuad1961.blogspot.com

Source: https://dev.to/townofdon/create-a-unity-to-itchio-deployment-pipeline-using-butler-bash-scripting-3hbe

0 Response to "How to Upload Unity Webgl to Itchi"

Post a Comment

Iklan Atas Artikel

Iklan Tengah Artikel 1

Iklan Tengah Artikel 2

Iklan Bawah Artikel